![]()
이번에는 이더리움 지갑 상세 화면과 입금 화면을 만들 것입니다.
지갑 상세 화면 만들기
지갑 상세 정보를 보여줄 화면을 만듭니다. 지갑 상세 화면에는 이더리움 잔액과 입금/출금 버튼을 보여 줄 것입니다. components/WalletInfoScreen.js 파일을 생성합니다.
1
2
3
4
5
6
7
8
9
10
11
12
13
14
15
16
17
18
19
20
21
22
23
24
25
26
27
28
29
30
31
32
33
34
35
36
37
38
39
40
41
42
43
44
45
46
47
48
49
50
51
52
53
54
55
56
57
58
59
| import React, { Component } from 'react';
import { StyleSheet, View, AsyncStorage } from 'react-native';
import { Container, Content, Header, Card, CardItem, Body, Text, Icon, Button, Left, Right, Thumbnail, Title } from 'native-base';
export default class WalletInfoScreen extends Component {
static navigationOptions = {
header: null
}
render() {
const wallet = this.props.navigation.state.params;
return (
<Content padder>
<Card transparent>
<CardItem>
<Body style={ styles.center }>
<Thumbnail source={{uri: 'https://s2.coinmarketcap.com/static/img/coins/64x64/1027.png'}} />
</Body>
</CardItem>
<CardItem>
<Body style={ styles.center }>
<Text style={{fontSize: 26, fontWeight:'600', marginTop: 10}}>
{ wallet.balance || '0.00' } { wallet.symbol }
</Text>
<Text style={{fontSize: 18, marginTop: 10, color:'gray'}}>
≈ ₩ {wallet.convertPrice || '0.00'}
</Text>
</Body>
</CardItem>
<CardItem>
<Body style={ styles.center }>
<Text note ellipsizeMode="middle" numberOfLines={1}>
{wallet.address}
</Text>
</Body>
</CardItem>
<CardItem>
<Body style={{ flexDirection: 'row', justifyContent: 'space-around'}}>
<Button bordered info style={{flex:1, justifyContent:'center', marginRight: 10}}><Text>입금</Text></Button>
<Button bordered warning style={{flex:1, justifyContent:'center', marginLeft: 10}}><Text>출금</Text></Button>
</Body>
</CardItem>
</Card>
</Content>
</Container>
);
}
}
const styles = StyleSheet.create({
container: {
flex: 1,
backgroundColor: 'white'
},
center: {
alignItems: 'center',
justifyContent: 'center',
}
});
|
navigation.state.params로 전달받은 지갑 정보 wallet를 출력합니다.- 아직 구체적인 기능을 구현하지는 않았습니다.
그다음 ./src/App.js 를 수정합니다. 네이게이터에 WalletInfoScreen을 추가합니다.
1
2
3
4
5
6
7
8
9
10
| import WalletInfoScreen from './components/WalletInfoScreen';
const AppStackNavigator = createStackNavigator({
Wallets: { screen: WalletsScreen },
CreateWallet: { screen: CreateWalletScreen },
WalletInfo: { screen: WalletInfoScreen },
},
{
});
|
- AppStackNavigator에
WalletInfo: { screen: WalletInfoScreen } 가 추가되었습니다.
components/WalletsScreen.js 파일을 수정합니다.
1
2
3
4
5
6
7
8
9
10
11
12
13
14
15
16
17
18
19
20
21
22
23
24
25
26
27
28
29
30
31
32
33
34
35
36
| export default class WalletsScreen extends Component {
static navigationOptions = {}
constructor(props) {/* (…) */}
_onWillFocus = payload => {/* (…) */}
render() {
return (
<>
<NavigationEvents
onWillFocus={this._onWillFocus}
/>
<Container style={styles.container}>
<Content padder>
{
this.state.wallets.map((wallet) => {
return (
<WalletComponent
key={wallet.address}
wallet={wallet}
onPress={() => {
this.props.navigation.navigate('WalletInfo', wallet)}
}/>
)
})
}
<Card>
{}
</Card>
</Content>
</Container>
</>
);
}
}
const styles = StyleSheet.create({});
|
- WalletComponent 컴포넌트의
onPress 속성에 navigation.navigate('WalletInfo', wallet) 를 입력합니다.
- 이제 지갑 컴포넌트를 클릭하면, WalletInfo 화면으로 이동하면서 선택한 wallet를 전달합니다.
마지막으로 components/WalletComponent.js 파일을 수정합니다.
1
2
3
4
5
6
7
8
9
10
11
12
| import { TouchableOpacity } from 'react-native';
export default function WalletComponent(props) {
const wallet = props.wallet;
return (
<TouchableOpacity onPress={props.onPress}>
<Card>
{/* (…) */}
</Card>
</TouchableOpacity>
);
}
|
- react-native 에서
TouchableOpacity를 import 합니다.
<Card> 컴포넌트를 <TouchableOpacity> 로 감쌉니다.<TouchableOpacity>의 onPress 속성에 props.onPress를 입력합니다. props.onPress는 앞서 WalletsScreen에서 전달받은 {() => this.props.navigation.navigate('WalletInfo', wallet)}입니다.
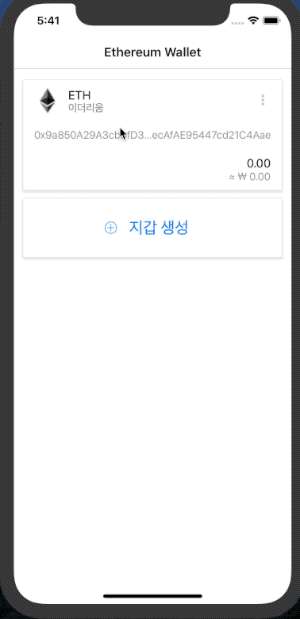
여기까지 작업하고 지갑 목록에서 지갑을 선택해 봅니다. 그럼 지갑 상세화면으로 이동하는 것을 볼 수 있습니다.
![]()
입금 화면 만들기
입금 화면에서는 QRCode 이미지와 이더리움 주소를 보여 줄 것입니다. 먼저 react-native-qrcode 모듈을 설치합니다.
1
| $ npm install react-native-qrcode --save
|
그리고 components/ReceiveScreen.js 파일을 생성합니다.
1
2
3
4
5
6
7
8
9
10
11
12
13
14
15
16
17
18
19
20
21
22
23
24
25
26
27
28
29
30
31
32
33
34
35
36
37
38
39
40
41
42
43
44
45
46
47
48
49
50
51
52
53
54
55
56
57
58
59
60
61
62
63
64
65
66
67
68
69
70
71
72
73
74
75
76
77
78
79
80
81
82
83
84
85
86
87
88
89
90
91
92
| import React, { Component } from 'react';
import { StyleSheet, View, Clipboard, Share } from 'react-native';
import { Container, Content, Header, Card, CardItem, Body, Text, Icon, Button, Left, Right, Thumbnail, Title, Toast } from 'native-base';
import QRCode from 'react-native-qrcode';
export default class ReceiveScreen extends Component {
static navigationOptions = {
header: null
}
render() {
const wallet = this.props.navigation.state.params;
return (
<Container style={styles.container}>
<Header>
<Left>
<Button
transparent
onPress={() => this.props.navigation.goBack()}>
<Icon name="arrow-back" />
</Button>
</Left>
<Body>
<Title>{ wallet.symbol } 입금</Title>
</Body>
<Right />
</Header>
<Content padder>
<Card transparent>
<CardItem>
<Body style={ styles.center }>
<Thumbnail
circle
source={{uri: 'https://s2.coinmarketcap.com/static/img/coins/64x64/1027.png'}} />
</Body>
</CardItem>
<CardItem>
<Body style={[styles.center, {marginVertical: 20}]}>
<QRCode
value={wallet.address}
bgColor='black'
fgColor='white'
size={200}
/>
</Body>
</CardItem>
<CardItem>
<Body style={[styles.center, {padding:10, backgroundColor:'#EFEFEF'}]}>
<Text
note
onPress={() => {
Clipboard.setString(wallet.address);
Toast.show({
text: "주소 복사가 완료되었습니다.",
position: "bottom",
duration: 1000
});
}}>
{wallet.address}
<Icon name='content-copy' type="MaterialCommunityIcons" style={{fontSize:15, color:'#777'}}/>
</Text>
</Body>
</CardItem>
<CardItem>
<Body>
<Button bordered info block
style={{marginHorizontal:100}}
onPress={() => {
Share.share({
message: wallet.address
});
}
}><Text>주소 공유</Text></Button>
</Body>
</CardItem>
</Card>
</Content>
</Container>
);
}
}
const styles = StyleSheet.create({
container: {
flex: 1,
backgroundColor: 'white'
},
center: {
alignItems: 'center',
justifyContent: 'center',
}
});
|
<QRCode> 컴포넌트를 사용하여 주소를 QR코드로 보여줍니다.- 주소를 선택하면 Clipboard을 사용하여 클립보드에 복사합니다. 그리고 Toast 메세지를 출력합니다.
- 주소 공유 버튼을 누르면 공유하기 기능을 수행합니다.
마지막으로 ./src/App.js를 수정합니다.
1
2
3
4
5
6
7
8
9
10
11
12
13
14
15
16
17
18
19
20
21
22
23
| import
import { Root } from "native-base";
import ReceiveScreen from './components/ReceiveScreen';
const AppStackNavigator = createStackNavigator({
Wallets: { screen: WalletsScreen },
CreateWallet: { screen: CreateWalletScreen },
WalletInfo: { screen: WalletInfoScreen },
ReceiveScreen: { screen: ReceiveScreen },
},
{
defaultNavigationOptions: {
headerBackTitle: null,
},
});
const AppContainer = createAppContainer(AppStackNavigator);
export default () => (
<Root>
<AppContainer />
</Root>
);
|
- 네이게이터에
ReceiveScreen: { screen: ReceiveScreen } 를 추가하였습니다.
<AppContainer />를 native-base의 <Root>로 감쌌습니다. 이것은 NativeBase Toast 컴포넌트를 사용하기 위함입니다.
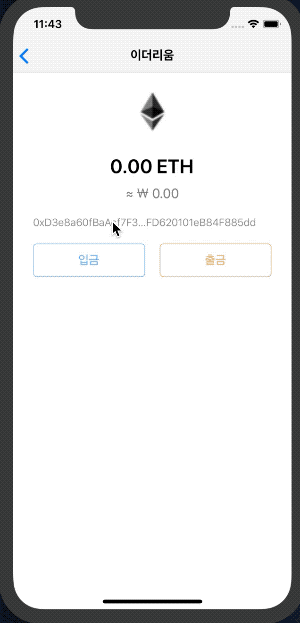
지갑 상세화면의 입금 버튼에 ReceiveScreen 화면을 연결하고 앱을 실행해봅니다.
![]()
* * *
이더리움 모바일 지갑을 구현하다 보니 구현 범위가 생각보다 크네요. 그리고 코드 량이 많아지다 보니 설명이 부족할 수 있다는 생각이 들었습니다. 읽다가 잘 이해가 안되는 부분을 댓글로 질문하면 최대한 답변 드리겠습니다.
여기까지 작업한 코드는 모두 깃허브에 업로드되어있습니다.
여기까지 읽어주셔서 감사합니다.